Microsoft Teams Meeting Add-in Missing on AVD? The Full Installation Guide for New Teams

🕵️♂️ Situation
For the past few weeks, I’ve been fighting a battle that anyone working with Azure Virtual Desktop probably knows all too well: getting Microsoft Teams installed properly, with the Teams Meeting Add-in actually showing up in Outlook.
On paper, it sounds simple, install Teams, install the add-in, and everything should work. But on AVD/Citrix/Horizon (Multisession), it quickly turns into a strange puzzle where nothing fits the way you expect.
- For some users the Teams Meeting add-in is visible while others don’t see it.
- Teams installed “successfully” but Outlook refused to load the add-in.
- Teams Meeting add-in has loaded but is missing in outlook.
- Teams is not optimized.
I tried every guide I could find and none of them painted the full picture, there were too many missing pieces. And some only explained a general overview that is not catered to real world scenarios.
After a lot of testing, breaking, rebuilding, and questioning, “why is this still not working? why is it not consistent?”, I finally did what every engineer ends up doing:
👉 Start from scratch and connect the dots myself.
📌 Important Notes:
- AVD Focus: This guide covers the installation of Teams and the Teams Meeting Add-in specifically for Azure Virtual Desktop (AVD) multisession environments.
- Citrix & Horizon: Although the overall concept is similar, Citrix and Omnissa Horizon have their own optimization components and requirements. Always follow the official documentation for those platforms.
- Windows Server OS: Teams on Windows Server editions (2019/2022) have different limitations and installation steps. Refer to Microsoft’s guide when deploying Teams on Server OS.
- AVD Personal Desktops: For normal persistent desktops, Teams can be installed per-user. However, if your environment rebuilds or replaces Personal Desktop VMs regularly, the best approach is to install Teams machine-wide (using the same method as AVD multisession) to ensure Teams and the Teams Meeting Add-in are available on every new VM.
💡 So what is the solution then ?
Before we start, I recommend to going through with the Microsoft guide for antivirus exclusions and other requirements, Install Teams for VDI
The real issue wasn’t the installation; it was that several critical requirements were missing or incomplete. On AVD, Teams +, the Meeting Add-in only works reliably when you:
1. Ensure WebView2 is installed:
Teams and the Teams Meeting Add-in both rely on WebView2 for the modern UI and rendering. If WebView2 isn’t installed, the add-in’s functionality is degraded, and the new Teams client may experience performance degradation.
2. Enable WVD optimization:
This activates Microsoft’s AVD optimizations inside Teams (not enabled by default). Without it Teams will likely run with increased resource consumption on the virtual machine, as the client will not use the optimized WebRTC media redirection to handle audio and video in the session.
It is also recommended to disable automatic updates.
1
2
New-ItemProperty -Path "HKLM:\SOFTWARE\Microsoft\Teams" -Name "IsWVDEnvironment" -PropertyType DWord -Value 1 -Force
New-ItemProperty -Path "HKLM:\SOFTWARE\Microsoft\Teams" -Name "disableAutoUpdate" -PropertyType DWord -Value 1 -Force
3. Remove all legacy Teams, old add-ins, and old WebRTC components:
Leftover Teams components, classic Teams, per-user installs, Store/APPX builds, or old WebRTC packages, can interfere with the new Teams client and the Teams Meeting Add-in. These remnants often cause inconsistent add-in loading, especially in AVD multisession environments.
These folders typically appear in:
1
2
3
4
5
%LOCALAPPDATA%\Microsoft\Teams
%APPDATA%\Microsoft\Teams
%LOCALAPPDATA%\Packages\MSTeams_8wekyb3d8bbwe
C:\Program Files (x86)\Teams Installer
C:\Program Files (x86)\Microsoft\Teams Meetings Add-in
Therefore, it is important to remove any legacy Teams folders and outdated add-in components before users sign in with the new Teams deployment.
4. Install the new Teams MSIX using the bootstrapper:
Download both teamsbootstrapper.exe and the MSIX package from Microsoft: Download Teams
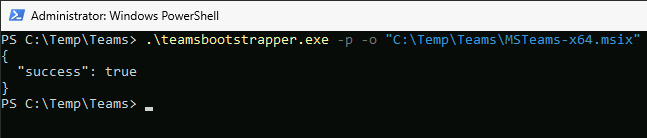
Run the bootstrapper to install Teams machine-wide:
1
.\teamsbootstrapper.exe -p -o "C:\path\teams.msix"
Example:
Key folders and location:
- App installer:
1
C:\Program Files\WindowsApps\MSTeams_*Version*_x64__8wekyb3d8bbwe
- User/app data:
1
C:\Users<alias>\AppData\Local\Packages\MSTeams_8wekyb3d8bbwe
5. Install the Teams Meeting Add-in (Two Options):
There are two supported ways to install the Teams Meeting Add-in (TMA).
Option A — Install Teams + Teams Meeting Add-in automatically (via bootstrapper):
Newer versions of teamsbootstrapper.exe (Product version 1.0.2508703) can install the Teams Meeting Add-in automatically as part of the Teams MSIX installation.
No additional MSI steps are required.
1
.\teamsbootstrapper.exe -p --installTMA -o "C:\Path\msteams.msix"
Example:

Option B — Install the Teams Meeting Add-in manually (MSI):
If your environment demands controlled deployment:
1
MicrosoftTeamsMeetingAddinInstaller.msi
👉 Note: You must install MS Teams using .\teamsbootstrapper.exe -p -o "C:\Path\msteams.msix" before you follow this option.
Get the Teams version to locate the correct path of MS Teams:
1
Get-AppxPackage -Name "*msteams*" | Select-Object -ExpandProperty Version
Get the Add-in binary version:
1
2
Get-AppLockerFileInformation -Path "C:\Program Files\WindowsApps\MSTeams_*Version*_x64__8wekyb3d8bbwe\MicrosoftTeamsMeetingAddinInstaller.msi" |
Select -ExpandProperty Publisher | Select BinaryVersion
Install via MSI:
- Version = Teams version you extracted in 5.2.1.
- BINARYVERSION = Add-in version you extracted in 5.2.2.
- TARGETDIR must stay consistent across installs so the Teams Meeting Add-in MSI can detect and clean up older versions properly.
1
Start-Process msiexec.exe -ArgumentList '/i "C:\Program Files\WindowsApps\MSTeams_*Version*_x64__8wekyb3d8bbwe\MicrosoftTeamsMeetingAddinInstaller.msi" ALLUSERS=1 /qn /norestart TARGETDIR="C:\Program Files (x86)\Microsoft\TeamsMettingAdd-in\"BINARYVERSION"\"' -Wait
👉 Recommendation: I recommend using Option A because it installs both Teams and the Teams Meeting Add-in in one step with no additional work required. However, you’re free to use Option B if you prefer the manual MSI method, both options achieve the same end result; Option B simply involves extra steps.
Scenario 01 — MS Teams Meeting Add-in Loading Behaviour (machine-wide):
On AVD (multisession) it is recommended to load Teams Meeting Add-in in machine-wide because the user will inherit it. You can do this by configuring via GPO or running a script to configure on the session hosts.
1
2
3
New-ItemProperty -Path "HKLM:\Software\Microsoft\Office\Outlook\Addins\TeamsAddin.FastConnect" -Type "DWord" -Name "LoadBehavior" -Value 3 -force
New-ItemProperty -Path "HKLM:\Software\Microsoft\Office\Outlook\Addins\TeamsAddin.FastConnect" -Type "String" -Name "Description" -Value "Microsoft Teams Meeting Add-in for Microsoft Office" -force
New-ItemProperty -Path "HKLM:\Software\Microsoft\Office\Outlook\Addins\TeamsAddin.FastConnect" -Type "String" -Name "FriendlyName" -Value "Microsoft Teams Meeting Add-in for Microsoft Office" -force
Scenario 02 — MS Teams Meeting Add-in Loading Behaviour (Per User):
In some environments, not all users use Teams or require the Teams Meeting Add-in. In this case, you can control the visibility of the add-in by creating the add-in registry keys under HKCU only for the targeted users or via GPO.
1
2
3
New-ItemProperty -Path "HKCU:\Software\Microsoft\Office\Outlook\Addins\TeamsAddin.FastConnect" -Type "DWord" -Name "LoadBehavior" -Value 3 -force
New-ItemProperty -Path "HKCU:\Software\Microsoft\Office\Outlook\Addins\TeamsAddin.FastConnect" -Type "String" -Name "Description" -Value "Microsoft Teams Meeting Add-in for Microsoft Office" -force
New-ItemProperty -Path "HKCU:\Software\Microsoft\Office\Outlook\Addins\TeamsAddin.FastConnect" -Type "String" -Name "FriendlyName" -Value "Microsoft Teams Meeting Add-in for Microsoft Office" -force
Registering the Teams Meeting Add-in DLL:
Manual DLL registration is usually not required, as both the bootstrapper and the MSI automatically perform the necessary COM/DLL registrations during installation.
However, in some AVD multisession environments, the Teams Meeting Add-in may still behave inconsistently across users. This can happen due to factors such as sysprepped images, FSLogix profile, or remnants from the classic Teams client.
In these situations, performing a manual machine-wide DLL registration is a clean and reliable fix that resolves most “inactive” or “missing” Teams Meeting Add-in issues without reinstalling Teams or the add-in.
Machine-wide (recommended)
1
2
regsvr32 /s /n /i "C:\Program Files (x86)\Microsoft\TeamsMeetingAdd-in\*MSTAMversion*\x64\Microsoft.Teams.AddinLoader.dll"
regsvr32 /s /n /i "C:\Program Files (x86)\Microsoft\TeamsMeetingAdd-in\*MSTAMversion*\x86\Microsoft.Teams.AddinLoader.dll"
6. Install the correct version of WebRTC:
Install the latest version of WebRTC. You can donwload the latest WebRTC from Download WebRTC
If you go through all these steps, it should work like charm, because it worked for our customer environments.
⚙️ Why do this manually? Let the script handle it:
To avoid mistakes and save time, I combined all steps into one automated script. It cleans old installs, configures AVD optimizations, installs new Teams, registers the DLLs if needed, and applies all required settings automatically.
You can find the full script on my GitHub. Install-MicrosoftTeams
🌟 Summary
Teams on AVD can feel like a puzzle, especially when the Meeting Add-in disappears, breaks, or behaves differently for each user. After troubleshooting these issues firsthand, this guide brings together every step needed for a clean and consistent installation. Whether you choose the simple bootstrapper method or the manual MSI approach, you’ll have a repeatable setup that finally makes the Teams Meeting Add-in behave the way it should.
I encourage you to follow this guide provided it fits your environment and let me know how it goes. Hope this helps save you some time.
I’ll see you in my next post!